Removing information from FetchEH includes deleting mapped features and deleting table records that are not mapped, such Inspections, Applications, Permits, O&M Events and Fees, or an unmapped system component (Septic Tank, Drain Field, etc.).
Deleting a mapped feature can be done using either the Edit Features menu or a Form. However, deleting table records is always done using a Form as there is no spatial representation of the table record on the map.
Deleting mapped features can be done one feature at a time, or by selecting multiple features to delete them all at once.
Parent Mapped Features: Restaurants, Systems, Wells and Soil Borings are considered parent features in that they may have one or more related mapped features and/or table records linked or related to them.
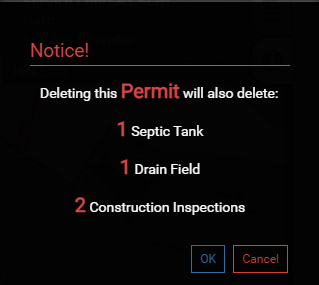
For example, a Restaurant may contain multiple Inspections with Violations, or a System may contain an Application, Permit, Inspections, Septic Tanks and Drainfields.
When deleting a parent feature using the Edit Features menu, all linked Forms will also be removed. This includes mapped features and table records.
Deleting a Single Mapped Feature #
Deleting a single mapped feature starts by selecting the feature that is to be deleted.
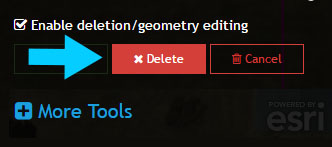
1. Select the Building and toggle on the ‘Edit deletion/geometry editing’ option located at the bottom of the Edit Features side pane. If the Edit Features side pane is not open, select ‘Feature Editing Controls’ from the Main Menu.

2. With the Building selected, select ‘Delete’ to remove the Building.
After selecting ‘Delete’ you will be prompted to make sure you want to delete the feature. In this example select ‘Cancel’ to retain the Building. Selecting ‘Ok’ will permanently remove the Building.
Deleting Multiple Mapped Features #
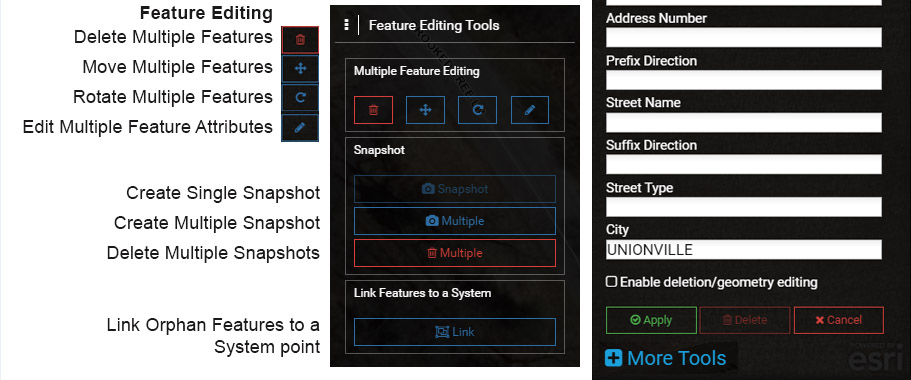
1. To delete more than one feature, use the Edit Features side pane to select ‘More Tools’.
This will open the ‘Feature Editing Tools’ menu, which provides options for Deleting, Moving, Rotating and Editing Attributes for multiple features. It also provides options for managing Snapshots.
2. Select ‘Delete Multiple Features’ from the Feature Editing Tools menu.
Note that to use the ‘Multiple’ delete option, you can’t have features that are selected and have ‘Enable deletion/geometry editing’ enabled.
After selecting ‘Delete Multiple Features’ a new menu will appear on the map indicating that there are currently ‘No Selected Features’.
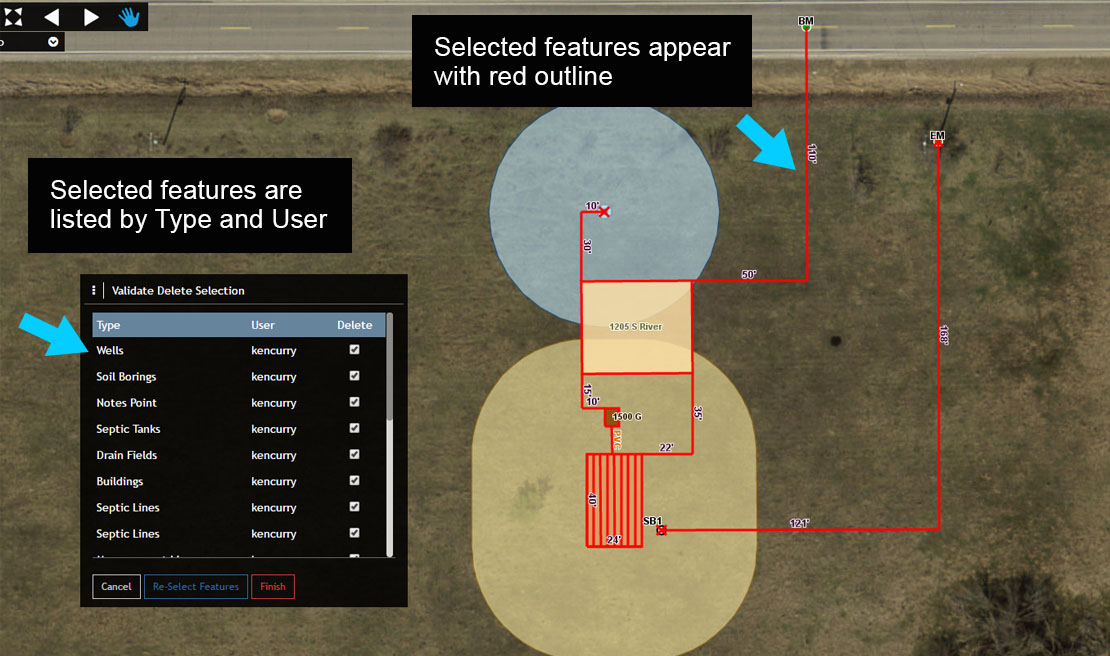
3. To select multiple features, move the cursor over the map, press and hold the left mouse button and drag a box around the features that you would like to delete. In this example try to select all of the features mapped for the Site Plan.
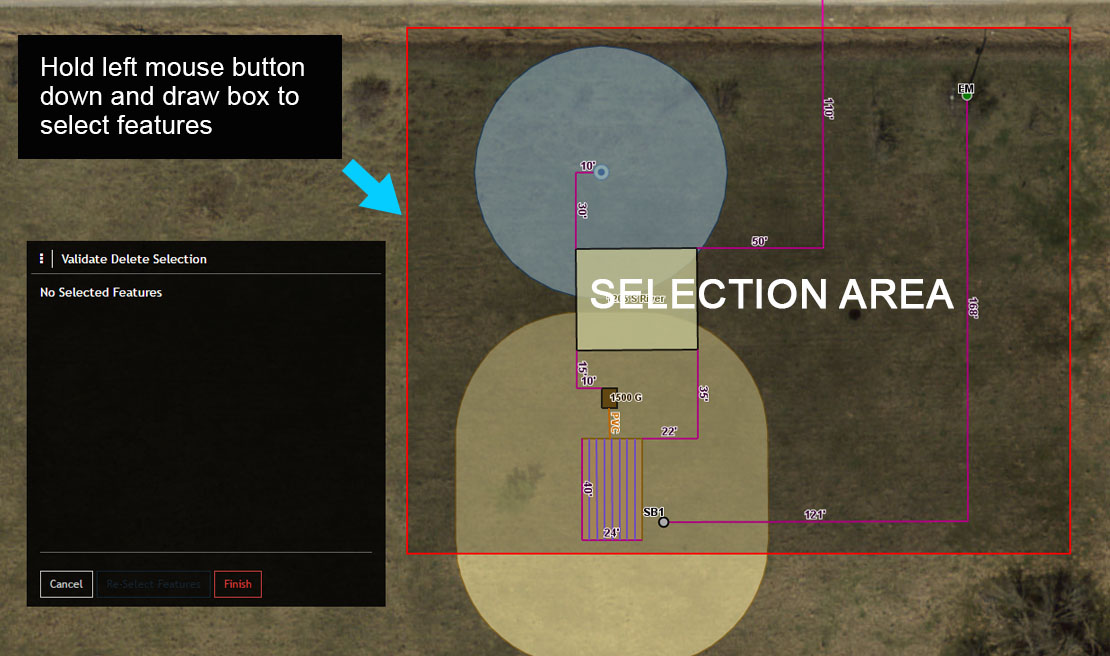
The selected features will now be listed in the ‘Validate Delete Selection’ and highlighted in red on the map. The ‘Validate Delete Selection’ window is organized by Feature Type (Wells, Septic Tanks, Drain Fields, etc.) and User.
The Delete checkbox located to the right of the User is used to remove features from the selection that you do not want to delete. Remove a feature from the selection by unchecking the Delete checkbox.
3. Remove the Wells, Septic Tanks and Drain Fields from the selection and note how the features are no longer highlighted in red on the map.
Experiment with removing and adding features to the selection and try using the ‘Re-Select Features’ option to start the selection over.
4. If you would like to complete the process of removing multiple features, select ‘Finish’. You will be prompted with a final notification asking if you really want to delete the feature(s). Remember that deleting features is permanent.
Deleting Features & Table Records Using a Form #
Deleting mapped features and table records can be accomplished using Forms.
1. Start by selecting the System point and opening the Onsite Permit or System Information Form.
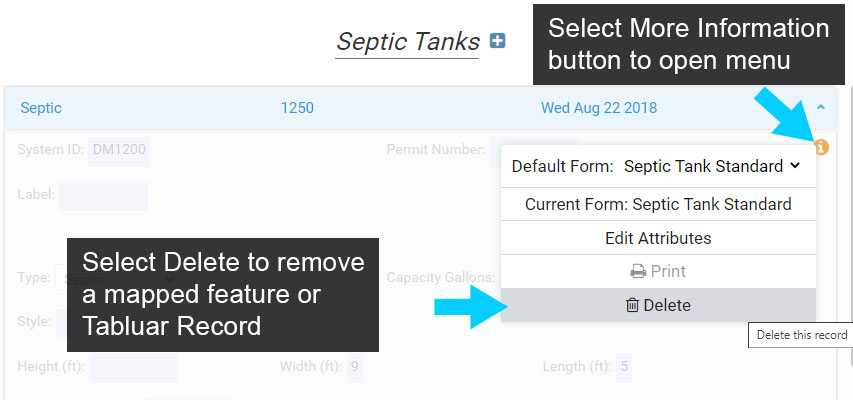
2. Next, select ‘Edit’ to start editing and scroll down to the Septic Tank under the Permit or as it is listed in the System Information Form.
3. Select the ‘More information’ button (i icon). This will open a new menu with the ‘Delete’ option.
4. Selecting Delete from the menu will remove the Septic Tank from the Permit and the System, and remove the Septic Tank from the map.
If you select Delete you will be prompted to make sure you want to delete the Septic Tank.
Deleting Table Records #
If the Onsite Permit or System Information Form is not open, open the Form.
Enable editing and scroll down to the Permit, or not using Permitting scroll to the Soil Boring > Soil Horizon. Expand the Permit accordion if it is not already visible.
5. Select the ‘More information’ button (i icon).
6. Finally, select Delete to remove the Permit.
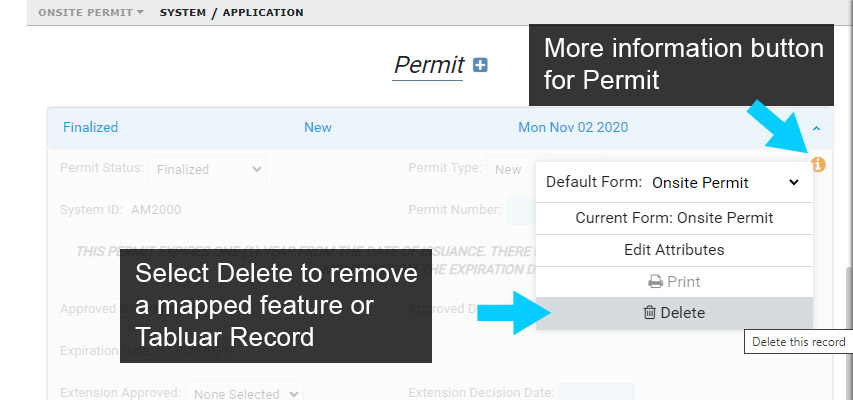
Note that deleting the Permit will also delete any components (mapped or unmapped Septic Tanks and Drainfields), Inspections and Fees under that Permit.